Learning the basics of ReactJS
Posted by Zubier Abdullah on 15-02-2020
Originally written sometime in 2018 https://medium.com/@zubierabd/learning-the-basics-of-react-js-41cfae50d0ee
I would like to preface this with the caveat that I didn't know much React when I wrote this (even know, over a year and a half later, I am still learning.)
I wrote this tutorial a long time ago to get to grips with the framework and to help myself become a better frontend developer. As I go through this code, it makes me cringe to see but I am keeping it anyway because it is important to remember where you have come from especially when your goals seem unattainable.
Enjoy
What is React?
React is a Javascript Library built by Facebook to make creating UI elements faster and easier. That’s the cookie cutter definition but what it allows us, as developers to do, is to code in an extremely modular fashion. We can break down each aspect of our UI into smaller simple components and, like blocks of Lego, fashion them into something cool and put them wherever we want.
Now for the purposes of this, I will be using the create-react-app command from the terminal to create our project files. If you don’t have it installed, the link is given here.
You will need Node Project manager (npm) installed on your computer as well as an IDE.
run the following commands to see if you are good to go
node --version
npm install --global create-react-app
create-react-app newapp
cd newapp
Use create-react-app from the terminal to create an app and get rid of everything in the src folder except App.js, App.css, index.js and index.css.

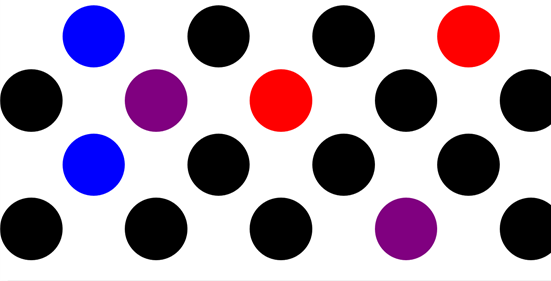
Nothing remarkable — a set of black dots on a white background and it isn’t. I am using a very simple concept to help teach what does what in React. What happens if I click it though?

So essentially clicking any of the black balls will change their color, making them. Clicking on any of the white spaces will also change the color as well and create balls there as well.
Let’s take a look under the hood shall we?

Index.js is the file which is least modified. I leave it exactly the way Create-React-App makes it (CRA for short from now on). There are a number of import statements up on the top and the ReactDOM.render method is being used to render the App element at the div with the id = “root” of the HTML file.
Moving on

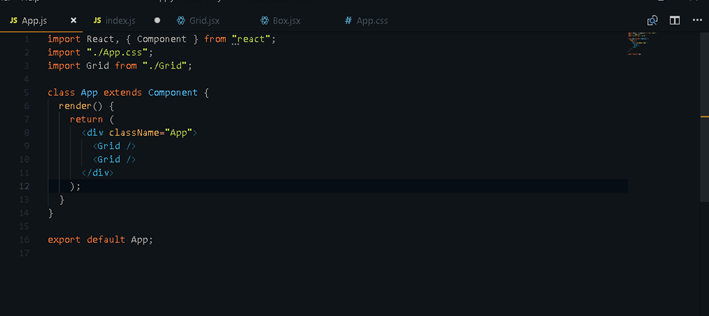
App.js
Here we are creating the App component which is being rendered in our Index.js as mentioned above. We are importing the Grid component, which we will be making soon. Classes in React are defined as above — at it’s simple they require a render() method and must return something.
A very simple react class

Back to App.js — you can see that it has nothing but a div which contains two Grid elements, which we will be making. Two points here — Each return statement can only return one object — one H1 tag but we can work around this by enclosing everything in a div.
The second point is that we are using something which looks like HTML but isn’t. It is called JSX and it is kind of a fusion of JS and HTML. Just remember the following points —
*className instead of Class
*{curly brackets means Javascript}
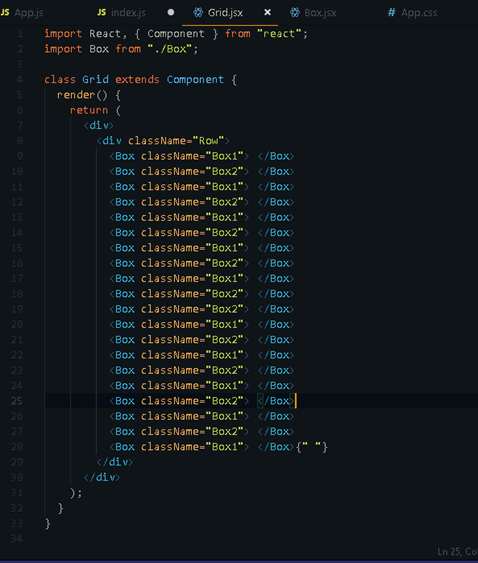
All right let’s go down one more level into our Grid component.

The Grid component has 20 Box components and not much else. Notice one thing though — we are feeding the className property into the Box element. The property keyword is very important. To put it simply, anything we choose to send into each element becomes a property of that element and we can put anything we want.
Moving on into the final level of abstraction,

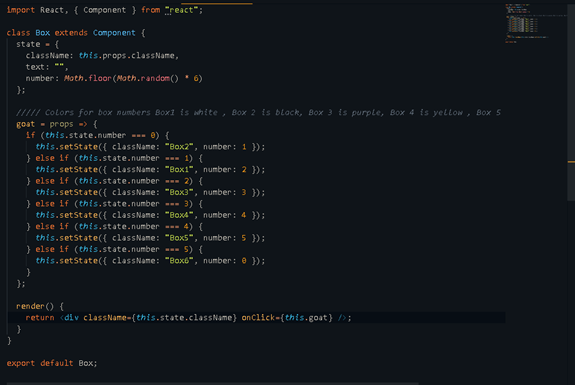
There are three overall interesting things happening here. Lets start with the simplest part- what is being returned.
The only thing being returned is an empty div with a className = {this.state.className} and an onClick = {this.goat}
Each component in React can have something called state which allows us to store anything we want in there. Remember props from a few minutes ago? State is the property of an element which is internal and props are external. Props can be passed from one element to another (A la us sending className from Grid to Box)
Now let us look at state:
state = {className: this.props.className,number: Math.floor(Math.random() * 6)};
State is a JavaScript object that has className, which it is inheriting from the Grid component and number, which is a random number being generated from 0–5.
The final bit of code that we have is the goat method (I know I need better names)
goat = () =>
{if (this.state.number === 0)
{this.setState({ className: "Box2", number: 1 });}
else if (this.state.number === 1) {this.setState({ className: "Box1", number: 2 });}
else if (this.state.number === 2) {this.setState({ className: "Box3", number: 3 });}
else if (this.state.number === 3) {this.setState({ className: "Box4", number: 4 });}
else if (this.state.number === 4) {this.setState({ className: "Box5", number: 5 });}
else if (this.state.number === 5) {this.setState({ className: "Box6", number: 0 });}};
So goat is a method which uses an arrow function and based on the number, it changes the className of the box on which it is invoked. The goat method is invoked onClick. So whenever we click a box, based on the number which is in state, the color changes. Notice we change the state using the this.setState method, which takes an object as input.
So
this.setState({className : box1}) ; //// Will work
instead of
this.setState(className = "box1"); //// Won't work
The final part of the code is the CSS file App.css. This is pretty simple CSS.
Each of the boxes has a different color and the color changes based on the class.
Finally
.App
{background-color: white;min-height: 100vh;min-width: 100vw;color: black;margin-top: 14px;}

.Box1 {width: 10vw;height: 9vw;background-color: white;display: inline-block;border-radius: 50%;}

.Box2 {width: 10vw;height: 10vw;background-color: black;display: inline-block;border-radius: 50%;}

.Box3 {width: 10vw;height: 10vw;background-color: purple;
display: inline-block;color: white;border-radius: 50%;text-align: center;}

.Box4 {width: 10vw;height: 10vw;background-color: yellow;display: inline-block;color: white;border-radius: 50%;text-align: center;}

.Box5 {width: 10vw;height: 10vw;background-color: red;display: inline-block;color: white;border-radius: 50%;text-align: center;}

.Box6 {width: 10vw;height: 10vw;background-color: blue;display: inline-block;color: white;border-radius: 50%;text-align: center;}
Thanks for reaching the end of this. I hope you find reading this to be even a bit useful.
Have a great day.